
CarPooling – RideShare Introduction
- Carpooling is the experience of sharing a ride together. We take it one step further by connecting car owners who have empty seats with co-travelers traveling to the same destination.
- With Carpooling, the rider and the driver heading to the same final destination can be mapped reducing the travel cost and pollution.
- Driver/User can set their preferences like select route preference, gender, music, age group, vaccination status, pets, and smoking.
- Relay Ride with a hop in between can be matched – If the user wants to move from place ‘A’ to place ‘C’ and if there is no direct pool match and if there is 2 pool matches one of which goes from Place ‘A’ to Place ‘B’ and the other pool provider Place ‘B’ to Place ‘C’. then the user will be shown the match with the two pool providers with a hop interval.
- Carpool drivers will have the option to schedule recurring rides for the same pickup and drop location daily from my rides post creating a ride from the offer pool option.
Driver Side Flow
1. Offer Pool
– Users need to enter the pickup location, drop location, vehicle | seats available, Date & Time of journey offer a pool ride. (Figure 1.1)
– After selecting vehicle | seats it will redirect to a page where the user can select from available vehicles which he has added before and offer a Fare amount. (Figure 1.2)
– Once clicked on confirm eco meter of how much fuel will be saved be shown and the ride will be listed and shown to users who want to book a ride.
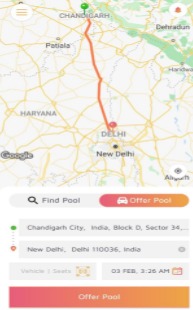
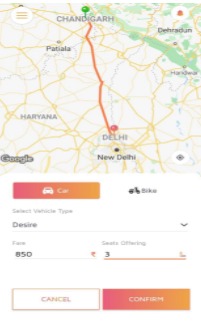
Figure 1.1 & 1.2: Offer pool and select vehicle
2. Carpool Profile
– Before offering a pool ride, the user needs to add his vehicle and need to get the documents and vehicle documents verified which will be a mandatory step to offer a ride. (Figure 1.3)
– User offering pool rides need to set preferences from the carpool profile section on the route. (Figure 1.4)
Path : Side Menu > Carpool Profile > Preference > Select Ride Giver option and set preferences
.
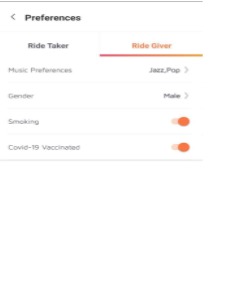
Figure 1.3 & 1.4: Profile verification and Preferences.
3. My Rides & Carpool Requests
– User can monitor from my rides tab in the side menu from where the user can Reschedule, Schedule Recurring, Edit ride and cancel the ride. (Figure 1.5)
– In schedule recurring drivers can select days of a week where the same ride can be scheduled and can also specify the time on a daily basis, and clients to click on done to update the ride. (Figure 1.6)
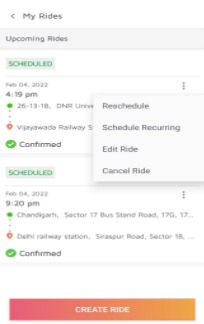
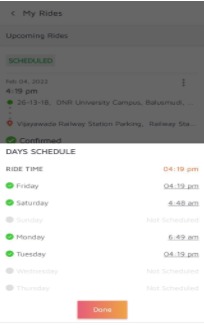
Figure1.5 & 1.6: Reschedule, Edit, Cancel rides, and Recurring schedule setup.
– Once the User ‘B’ book a pool ride the notification will be sent and a request is shown in User ‘A’ Side Menu > Carpool Requests where customer A can accept the ride in the same way User ‘A’ can book multiple rides from Users B, C and D. (Figure 1.7)
– User ‘A’ has to navigate to my rides to start the ride tap on the ride and User ‘A’ will be shown with the user’s list and start ride option.
– User ‘A’ needs to join the customer by entering the OTP or user ‘B’ can directly check-in from the app by clicking on the check-in option. (Figure 1.8)
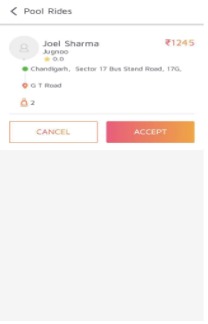
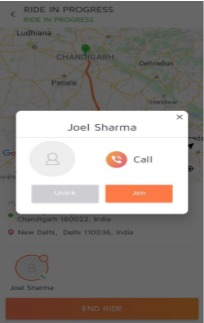
Figure 1.7 & 1.8: Accept carpool request and start a ride.
– User ‘A’ can drop the other users and collect the amount shown and end the ride at the end ride screen user can check the total amount received from the ride and provide feedback to each user who took the ride. (Figure 1.9 and 2.0)
– User’A’ can check the Eco meter on how much gas and co2 the user has reduced. (Figure 2.1)
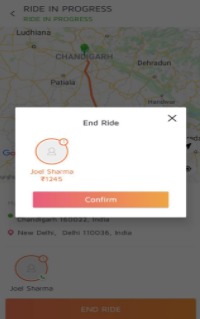
Figure 1.9: End ride screen showing the Fare Amount of each user to be collected.
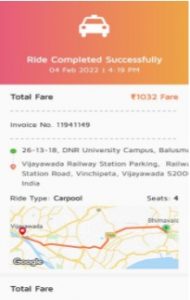

Figure 1.7 & 1.8: End ride screen with total fare amount from the ride, Eco meter, and rating screen for ride takers.
User Side Flow
1. Find a Pool
– Find Pool: The user can check the available ride options for the route by entering pick up and drop location, time, and fare amount. (Figure 1.9 & 2.0)
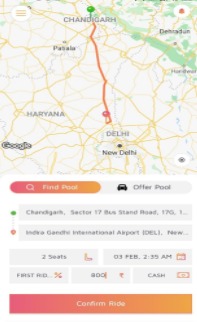
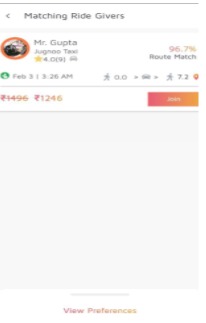
Figure 1.9 & 2.0: Fetch ride options by entering the pick up and drop locations.
2. Preferences
– User can select preferences by sliding the preference from the bottom- Route matches preference, music, Gender, smoking, and other preferences that can be managed from the admin panel. (Figure 2.1)
– User can select from the list of pool matches available and the user clicks on “Join” to send a pool request and the request will be sent to the ride provider for approval.
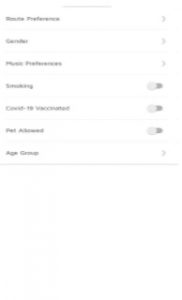
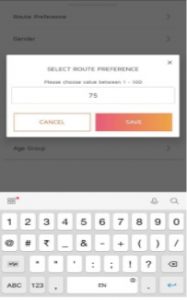
Figure 2.1 & 2.2: Set preferences screen on pool matched screen.
– Once the ride is approved user will be notified through the notification and during the ride user can share the OTP with the rider provider or self-check-in by clicking on the self-check-in option. (Figure 2.3)
– Once the ride is started user can track the ride from the application and can checkout at the end of the ride and the ride provider can also end the ride from his application. (Figure 2.4)

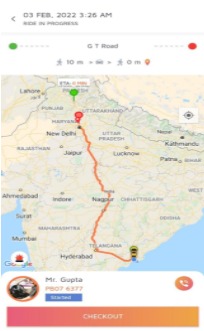
Figure 2.3 & 2.4: Checkin during the ride and Checkout during the ride end screens.
– Once the checkout is done the user can provide his feedback on the feedback screen and can view the ride details, fare amount, and Eco meter. (Figure 2.5 & 2.6)

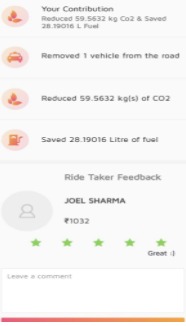
Figure 2.1 & 2.2: Ride end screen and rating page.
Admin Dashboard
1. Map view
– Map view gives the view of all live rides with pickup/drop location.
– Admin can monitor ongoing and scheduled tasks.
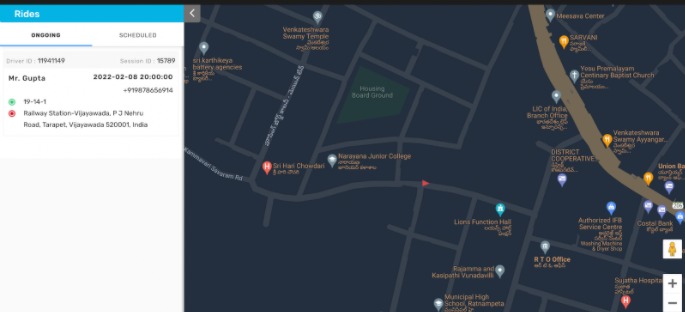
Figure 2.5: Map view
2. Ongoing Rides
– Admin can monitor ongoing rides which are currently happening through the ongoing rides option.
– Admin can End the pool ride from ongoing rides > view details of pool ride > end ride by confirming the drop location.
– Admin can view the ride provider details, passenger’s details who have onboarded on that ride through view details.
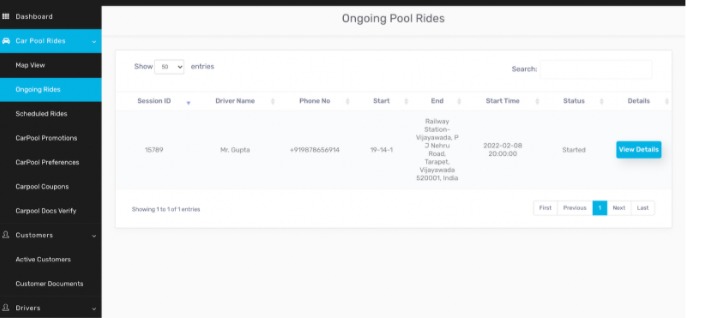
Figure 2.6:Ongoing rides.
3. Scheduled Rides
– The admin monitors all the scheduled rides and can cancel the rides from scheduled rides.
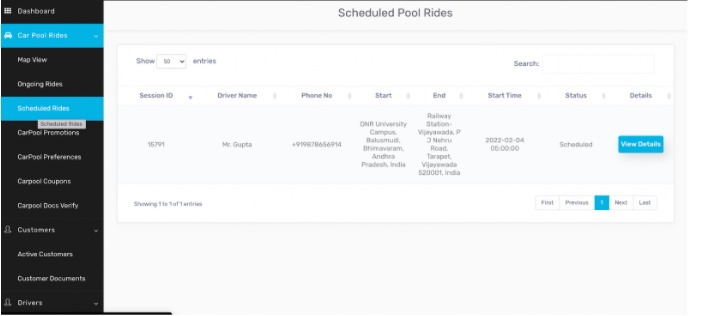
Figure 2.7: Scheduled rides.
4. Carpool Promotions & Coupons
Promotions can be created from the Admin Panel to give monetary benefits to the Users for the Rides.
promotions are basically for all the Users of a particular City. all the users who are in that region will be able to avail the Promo.
Discount Type: The type of discount can either be Flat or Percentage. In the case of Flat, a discount value needs to be specified.
In the case of Percentage, the Discount Percentage along with the Maximum Discount value needs to be specified.
Maximum Allowed: The maximum number of Customers who can get the benefit of the Promotion.
Per-User Limit: The number of times a Promotion can be used by a Customer.
Per Day Limit: The number of times a Promotion can be used by a Customer in a particular day
Terms and Conditions: An Admin can specify the Terms and Conditions for that particular Promotion. For next line, use <br> tag.
Coupons are for a specific set of Customers. To create coupons go to carpool coupons > and click on Add Coupons.
Upon creation of the Coupon, click on the Give Coupon to Users button.
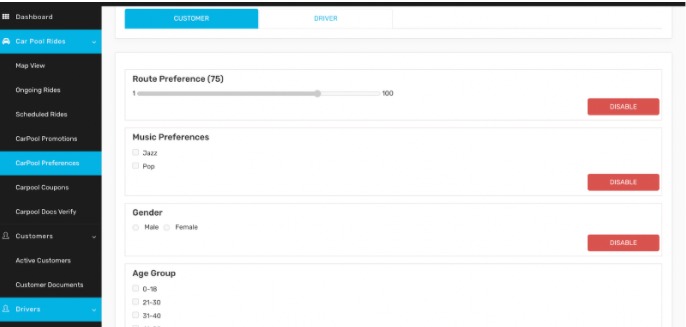
5. Carpool Preferences
Admin can enable, disable the pre-defined preferences from the admin panel > preferences section.
Admin can define both user and driver preference from the admin panel. there are multiple sets of preferences that the admin can enable or disable.
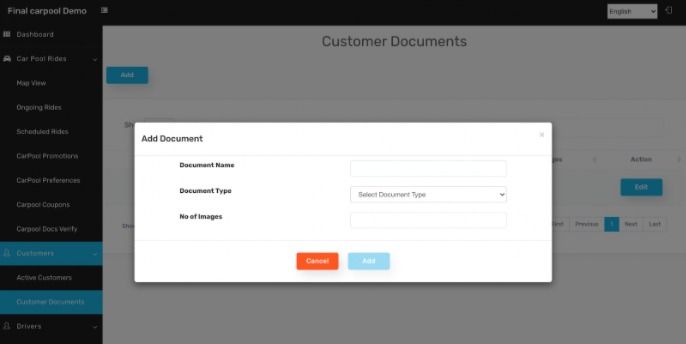
6. Customer documents
Customer documents like profile photos, National id can be added to the customer documents option.
Client on customer documents > Add option > To add customer documents
Leave A Comment?