
A.City Wide
City wide promotions are basically for all the Users for a Particular City. Promo Codes can be created for a specific region of a city as well and all the users who are in that region will be able to avail the Promo. To create a City Wide Promo Code, go to Promotions > City Wide. Click on Add Promotions.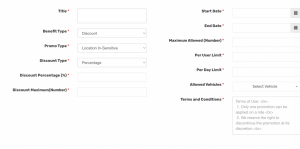 1. Title: The title of the Promotion.
2. Promo Type: A promotion can either be Location-Sensitive or Location-Insensitive. In the case of Location-Sensitive, three more fields are enabled namely, Location Type, Request Radius and Location.
i. Location Type: This drop-down field has two options, namely Pick-up or Drop-off. Pick-up means if a Customer enters a pickup location which lies in the Request Radius of the Location, only then it will be applicable.
Drop means if a Customer enters a drop location which lies in the Request Radius of the Location, only then it will be applicable.
ii. Request Radius: The distance from the central at long of the location to the entered value (in meters) up to which a region will be created where the Promotion will be applicable.
iii. Location: The location where the Promotion will be applicable.
3. Discount Type: The type of discount can either be Flat or Percentage. In the case of Flat, a discount value needs to be specified.
In the case of Percentage, the Discount Percentage along with the Maximum Discount value needs to be specified.
4. Start Date: The starting date of the Promotion.
5. End Date: The ending date of the Promotion.
6. Maximum Allowed: The maximum number of Customers who can get the benefit of the Promotion.
7. Per-User Limit: The number of times a Promotion can be used by a Customer.
8. Per Day Limit: The number of times a Promotion can be used by a Customer in a particular day.
9. Allowed Vehicles: This dropdown will show the active vehicle types in that particular city. An Admin can either choose a particular vehicle type or all vehicle types.
10. Terms and Conditions: An Admin can specify the Terms and Conditions for that particular Promotion. For next line, use <br> tag.
1. Title: The title of the Promotion.
2. Promo Type: A promotion can either be Location-Sensitive or Location-Insensitive. In the case of Location-Sensitive, three more fields are enabled namely, Location Type, Request Radius and Location.
i. Location Type: This drop-down field has two options, namely Pick-up or Drop-off. Pick-up means if a Customer enters a pickup location which lies in the Request Radius of the Location, only then it will be applicable.
Drop means if a Customer enters a drop location which lies in the Request Radius of the Location, only then it will be applicable.
ii. Request Radius: The distance from the central at long of the location to the entered value (in meters) up to which a region will be created where the Promotion will be applicable.
iii. Location: The location where the Promotion will be applicable.
3. Discount Type: The type of discount can either be Flat or Percentage. In the case of Flat, a discount value needs to be specified.
In the case of Percentage, the Discount Percentage along with the Maximum Discount value needs to be specified.
4. Start Date: The starting date of the Promotion.
5. End Date: The ending date of the Promotion.
6. Maximum Allowed: The maximum number of Customers who can get the benefit of the Promotion.
7. Per-User Limit: The number of times a Promotion can be used by a Customer.
8. Per Day Limit: The number of times a Promotion can be used by a Customer in a particular day.
9. Allowed Vehicles: This dropdown will show the active vehicle types in that particular city. An Admin can either choose a particular vehicle type or all vehicle types.
10. Terms and Conditions: An Admin can specify the Terms and Conditions for that particular Promotion. For next line, use <br> tag.
B. Coupons
Coupons are for a specific set of Customers. To create a City-Wide Promo Code, go to Promotions > Coupons and click on Add Coupons.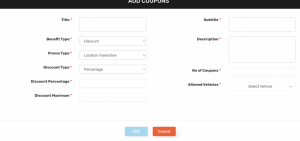 Coupons
Upon creation of the Coupon, click on Give Coupon to Users button.
1. Title: The title of the Coupon.
2. Promo Type: A coupon can either be Location-Sensitive or Location-Insensitive. In the case of Location-Sensitive, three more fields are enabled namely, Location Type, Request Radius and Location.
i. Location Type: This drop-down field has two options, namely Pick-up or Drop-off. Pick-up means if a Customer enters a pickup location which lies in the Request Radius of the Location, only then it will be applicable.
Drop means if a Customer enters a drop location which lies in the Request Radius of the Location, only then it will be applicable.
ii. Request Radius: The distance from the centre lat long of the location to the entered value (in metres) up to which a region will be created where the Coupon will be applicable.
iii. Location: The location where the Coupon will be applicable.
3. Discount Type: The type of discount can either be Flat or Percentage. In the case of Flat, a discount value needs to be specified.
In the case of Percentage, the Discount Percentage along with the Maximum Discount value needs to be specified.
4. Subtitle: The subtitle of the Coupon.
5. Description: The description of the Coupon.
6. No. of Coupons: The number of coupons which the Customers will receive once sent via push.
7. Allowed Vehicles: This dropdown will show the active vehicle types in that particular city. An Admin can either choose a particular vehicle type or all vehicle types.
Coupons
Upon creation of the Coupon, click on Give Coupon to Users button.
1. Title: The title of the Coupon.
2. Promo Type: A coupon can either be Location-Sensitive or Location-Insensitive. In the case of Location-Sensitive, three more fields are enabled namely, Location Type, Request Radius and Location.
i. Location Type: This drop-down field has two options, namely Pick-up or Drop-off. Pick-up means if a Customer enters a pickup location which lies in the Request Radius of the Location, only then it will be applicable.
Drop means if a Customer enters a drop location which lies in the Request Radius of the Location, only then it will be applicable.
ii. Request Radius: The distance from the centre lat long of the location to the entered value (in metres) up to which a region will be created where the Coupon will be applicable.
iii. Location: The location where the Coupon will be applicable.
3. Discount Type: The type of discount can either be Flat or Percentage. In the case of Flat, a discount value needs to be specified.
In the case of Percentage, the Discount Percentage along with the Maximum Discount value needs to be specified.
4. Subtitle: The subtitle of the Coupon.
5. Description: The description of the Coupon.
6. No. of Coupons: The number of coupons which the Customers will receive once sent via push.
7. Allowed Vehicles: This dropdown will show the active vehicle types in that particular city. An Admin can either choose a particular vehicle type or all vehicle types.
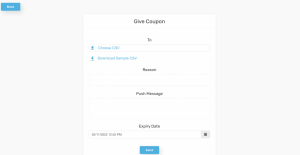 Give out coupons to the selected Customers
Following are the steps to fetch the User IDs:
1. Go to Analytics > Reports > User Details report.
2. Export the data with the download icon and choose CSV (You can filter the data before as per the requirement if you do not want to send messages to all the users) 3. Copy all the User IDs from the CSV file
4. Now download the sample CSV file from the Coupons section.
5. Open it in Microsoft Excel and paste all the User IDs (remove the one in the second field as it is a dummy User ID). Once that is done, save the file.
6. Before you upload the file, please check if the file is in the correct format, that is, .csv 7. Upload the .csv file 8. Type the Reason and the Message content along with an Expiry Date.
9. Click on the Send button.
Give out coupons to the selected Customers
Following are the steps to fetch the User IDs:
1. Go to Analytics > Reports > User Details report.
2. Export the data with the download icon and choose CSV (You can filter the data before as per the requirement if you do not want to send messages to all the users) 3. Copy all the User IDs from the CSV file
4. Now download the sample CSV file from the Coupons section.
5. Open it in Microsoft Excel and paste all the User IDs (remove the one in the second field as it is a dummy User ID). Once that is done, save the file.
6. Before you upload the file, please check if the file is in the correct format, that is, .csv 7. Upload the .csv file 8. Type the Reason and the Message content along with an Expiry Date.
9. Click on the Send button.
C. Promo Codes
Promo Codes can be keyed in by the Customer on the Promotions section. The coupons created, as mentioned above, can be mapped with a Promo Code so that as soon as the Customer keys in the keyword, the Coupon is fetched. A Promo Code can also be associated with Wallet Cash.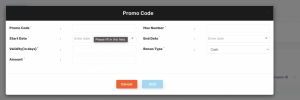 Promo Codes
1. Promo Code: The keyword which is to be entered by the Customer in order to redeem Coupon or Wallet Cash.
2. Max Number: It is the number of Customers who can use this Promo Code. 3. Start Date: The starting date of the Promo Code.
4. End Date: The ending date of the Promo Code.
5. Validity: The number of days up to which the Coupon or Wallet cash redeemed will be valid post entering the Promo Code.
6. Bonus Type: This drop-down lets the Admin choose between Coupon or Wallet Cash. In the case of Coupons, only the Active Coupons will be visible.
In the case of Wallet Cash, an extra field will appear with the Value where the Cash value needs to be entered.
Promo Codes
1. Promo Code: The keyword which is to be entered by the Customer in order to redeem Coupon or Wallet Cash.
2. Max Number: It is the number of Customers who can use this Promo Code. 3. Start Date: The starting date of the Promo Code.
4. End Date: The ending date of the Promo Code.
5. Validity: The number of days up to which the Coupon or Wallet cash redeemed will be valid post entering the Promo Code.
6. Bonus Type: This drop-down lets the Admin choose between Coupon or Wallet Cash. In the case of Coupons, only the Active Coupons will be visible.
In the case of Wallet Cash, an extra field will appear with the Value where the Cash value needs to be entered.
Leave A Comment?